I’ve been shopping around for a new control bar lately which got me thinking, why not bring all there is to know about kite control sticks into one post? It’s not rocket science but there are still things to consider, so here’s a guide to a 4-line control bar and the industry standard safety alternatives. All brands have their own take on design and functionality, but generally they all work as the one pictured below.
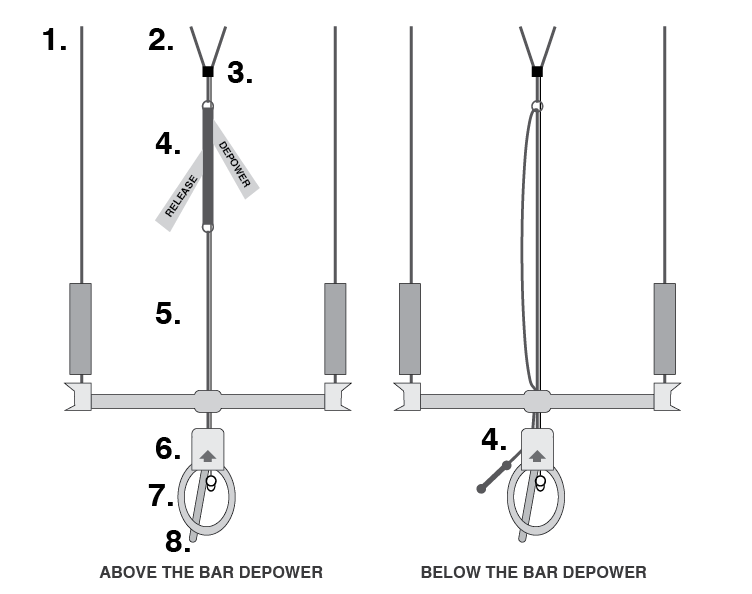
1. Back lines/steering lines
The steering lines go to the rear ends of the kite. Some old safety systems flag out on one of these using the so-called Oshit handle.
2. Front lines
Attached to the bridles of the kite (for SLE kites). Most 4-line safety systems will flag out on one or both of these.
3. Swivel
The swivel is able to rotate so that the front lines can untwist automatically after kite loops, backrolls etc. To be honest I’ve never seen a swivel that works 100% so if you spin a lot, look for a bar with a below the bar swivel as well so you can manually untwist the lines. Twisted front lines is mainly something to avoid if the kite flags on one or both of these, since the flag line could potentially get stuck and the kite won’t flag out completely.
4. Depower adjuster/trim strap
Most bars adjust their depower above the bar, but some are trimmed below the bar. With above the bar you either have have two adjusters (as depicted here), one to depower and one to release the depower, or you use a cleat as in the below the bar option (but the cleat is above the bar).
With below the bar trim, you use a cleat to lock the trim line in a preferred length. Below-the-bar trimming is usually not preferred due to ergonomic disadvantages, but it’s personal preference in the end.
Both systems work the same way. By pulling in the trim line the front lines become shorter which changes the angle of the kite, which in turn reduces the power of the kite. If you have a very long depower line and make the front lines too short your kite will not perform well and finally stall (which is exactly what we want if we want to depower the kite fully for self landing or in a hazardous situation).
5. Bar throw
This is where you fine tune the power of the kite by adjusting the angle of the kite. Pull the bar in and you make the back lines shorter, thus giving the kite a boost in power. Push the bar out and you make them longer resulting in more load on the front lines and less power. When riding you want to find a sweet spot where all lines have equal load for optimal performance.
When unhooking you’re automatically going to pull the bar in as much as possible. To compensate for this shortening of the back lines you want to trim the depower so the front lines are shortened equal amount. If not, the unequal load will make the kite stall.
6. Quick release
Often referred to as QR. Your no. 1 safety mechanism. Often activated by pushing it away from your body, the QR will activate your safety system and flag the kite so it depowers. After release your kite and bar will only be attached to you via your leash. Most modern systems are quite quick and easy to reassemble while on the water.
7. Chicken loop
The interface between the bar and your harness. If you unhook from the harness all the power will go through your arms.
8. Donkey dick/chicken dick
Piece of plastic to make sure the chicken loop doesn’t unhook unintentionally. It could get in the way if you unhook a lot so removing it is an option.
How to connect your leash
Your leash is attached to your harness in one end and the bar in the other. This way you’re still connected to the kite if you’re unhooked and drop the bar, or if you activate the quick release. Depending on the situation you want the kite to depower fully, or just a bit. You can control this with the way you connect your leash to the bar’s safety system.
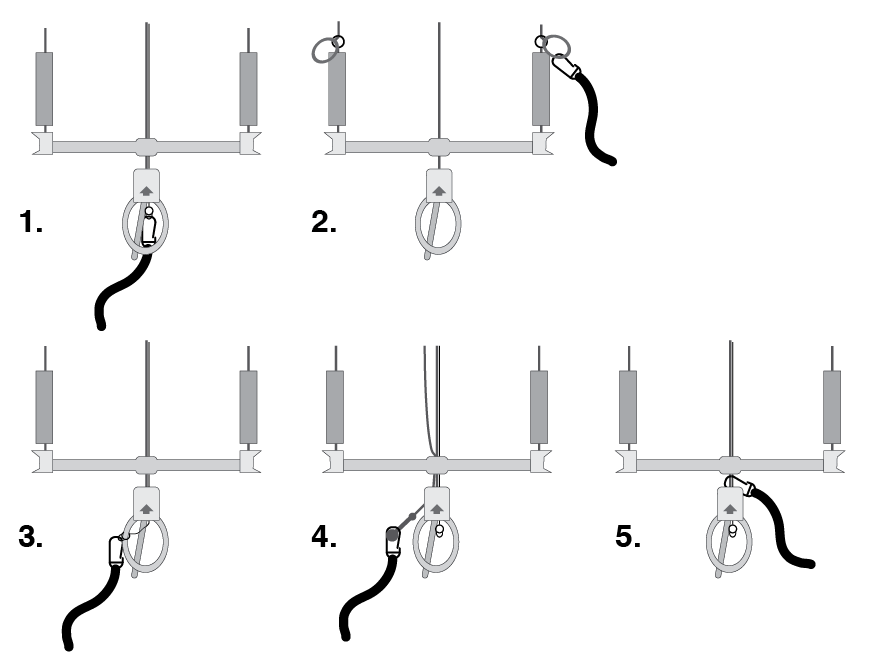
1. Flag on front line
This is the safest way to connect. If you pull the QR or loose the bar while unhooked the kite will flag out completely. It’s good for self landing and a recommended way to connect. The downside is that it takes longer to reassemble and there is risk for tangled lines or the kite to invert once it’s flagged out.
2. Flag on back line (Oshit handle)
Similar to front line flagging. This is more common on old bars and inferior because 1) You have the leash above the bar which can be quite distracting, and 2) Although a small risk, flagging out on the back line could cause the kite to loop and generate a lot of power when you least want it.
3. Suicide with flag possibility
A good best-of-both-worlds solution for riders practising unhooked tricks. If the QR is activated the kite will flag on a from line, but if the bar is dropped while unhooked the kite will still be powered up so it’s easy to pull it in and keep riding. You still want the kite to depower 50% – 80% so you’re not being dragged without a chance to recover the bar so make sure you have a lot of bar throw which will depower the kite.
4. Depower on both front lines
Mainly a safety option for below the bar depower trims. Both QR and unhooking will result in the depower line being pulled in as much as possible which depowers the kite to about 80% – 90%. It’s not a good solution for self landing in windy conditions as the kite is not completely depowered and is still flying on both front lines.
5. Suicide
Old school hard core style. Most advanced freestyle riders are still using this method as they can assess the situation, and if deemed safe it brings them the advantage of a very quick recovery if they drop the bar when being unhooked. Again, make sure to have a lot of bar throw so the kite still depowers a bit when using this connection.
Does the bar have to be the same brand as the kite?
No. Same brand as the kite could have advantages since they are designed to work together, but as long as it’s a 4-line kite designed for equal line length you’ll be fine on any brand. I’ve mixed brands for years with good compatibility.
The one thing that does matter is where the front lines split. Some kites fly better with high splits and other on low splits. This is one thing you want to check before you mix brands.
What about 5-line kites?
They use the same bar, but with a 5th line you have the option to connect the depower and flag line to it.
So there you have it. Hope it was useful and remember to always understand your control bar’s safety system before using it for the first time.
I beleive there is a mistake on the first picture in numbers for Front lines and Back lines (1 and 2 should be exchanged).
Well spotted! Thanks for pointing out. I’ll correct it.